PDMShell add-in installation
Install the PDMShell add-in in the SOLIDWORKS PDM vault where the automation should run. PDMShell 4.0.91 includes the add-in, dependencies, and an integrity manifest inside the VeloPack installer payload.
Installing the standalone PDMShell desktop application does not silently install the add-in into every vault. Vault add-in deployment is optional and must be started explicitly by a vault administrator.
For the standalone PDMShell desktop application, see PDMShell standalone installation.
After the add-in is loaded in the vault, log in to that vault in standalone PDMShell. In the current release, use New > Vault script or Open > Vault script… in the main editor. See Vault scripts and Script settings for saving, triggers and access settings.
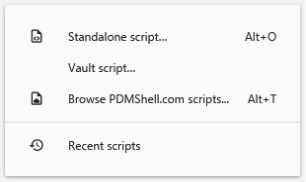
Install From PDMShell Settings
PDMShell Settings includes a dedicated Vault add-in page. A first-launch offer may also make vault deployment discoverable, but deployment remains optional.
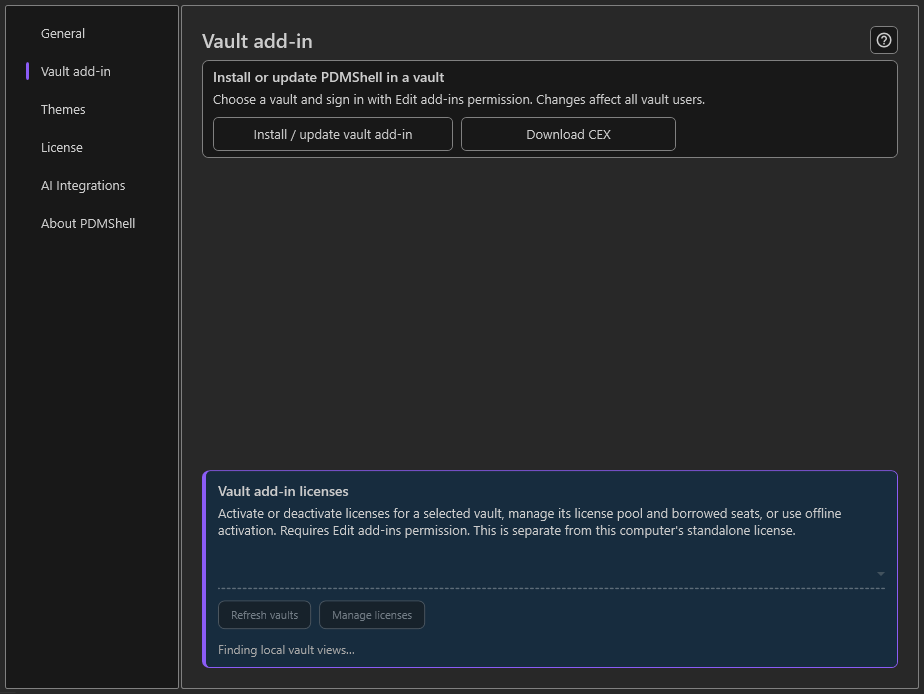
In 4.0.94, Download CEX beside the installation button opens the official Microsoft-hosted PDMShell Download Center. Choose and download the appropriate CEX there; the button does not install it automatically. Vault license management is in the separately colored section at the bottom of the page.
Screenshot rendered from the actual Settings controls with sample data; no vault installation or license changes were performed.
To install or update the vault add-in:
- Open PDMShell.
- Open
Settings. - Select
Vault add-in. - Select
Install / update vault add-in. - Choose the target vault.
- Select Install / update / repair directly, or use Log in and check first to inspect the versions.
- Sign in with a PDM user that has Edit add-ins permission and review the check result.
- Confirm deployment when prompted.
Review the selected vault and proposed operation before confirming. The installed-version check may load add-ins in its isolated worker.
This changes the shared vault for its users, not only the local workstation. Use an administrator-controlled rollout, especially in production vaults.
Inspection, installation and post-install verification each run in a fresh, short-lived process. Inspection may load existing add-ins, but that process exits before installation starts. The install worker does not depend on a successful installed-add-in inspection. Install / update / repair remains available after a failed check and is disabled while an operation is running.
Repair an existing installation
In 4.0.90 and newer, failed inspection offers an explicit Repair installation confirmation instead of blocking deployment. The installed version is unknown, not absent: review the warning that a newer installed version cannot be ruled out before confirming a replacement. Reinstalling the same version also requires repair confirmation. A known newer installed version remains protected against downgrade.
Repair still requires vault login, Edit add-ins permission and a valid bundled payload. It does not delete the existing add-in first, close other PDM clients or unload add-ins from their processes. Coordinate client restarts through your maintenance procedure.
If post-install verification fails, the installation outcome is unverified, not necessarily rolled back. PDMShell reports the failing stage, worker, exception type, HRESULT and dependency filename when available. Review those details before retrying; the app does not automatically retry or roll back.
Use the bundled add-in payload or an official add-in package. Do not add every DLL from the standalone application's folder to PDM Administration. Since 4.0.83 the add-in intentionally excludes editor-only dependencies. Close affected applications through your normal maintenance procedure before an update; PDMShell does not automatically terminate them.
An unsuccessful check or unverified installation is not a successful deployment. Existing COM registration and PDM cache problems may still require diagnosis; see Troubleshooting.
From 4.0.94, a failed setup operation displays an Open troubleshooting guide alert linking to SOLIDWORKS PDM error loading add-ins: Class not registered. Keep the original stage and error details when contacting support; the link is guidance, not an automatic repair.
Choose an installation path
Choose the installation path that matches the vault environment.
| Environment | Recommended options |
|---|---|
| PDMShell 4.0.66 or newer | Use Settings > Vault add-in to install or update the bundled vault add-in payload. |
| Standard connected system | Use PDMDeploy, or download the PDMShell .cex file from the PDMShell Download Center. |
| Restricted or air-gapped system | Use the Microsoft-hosted PDMShell Download Center, then use offline activation if the vault cannot reach the license service. |
Standard connected systems
For a standard vault that can reach Blue Byte Systems services, install the PDMShell add-in with PDMDeploy or by downloading the add-in .cex file.
Option 1: Install with PDMDeploy
PDMDeploy can install standard Blue Byte Systems add-ins into a SOLIDWORKS PDM vault.
Use this public activation code for standard Blue Byte Systems products:
E2A50448-9F15-42D9-B2F3-290409E81F94
If Blue Byte Systems developed a custom solution for you, use the private activation code from your welcome email instead.
After downloading PDMDeploy.cex, unblock the file before installing it:
- Right-click
PDMDeploy.cex. - Select
Properties. - Check
Unblock. - Select
OK.
To install PDMDeploy after downloading it, follow the PDMDeploy installation article.
After PDMDeploy is installed, open the SOLIDWORKS PDM Administration tool and log in to the vault with a PDM user that has the Edit Add-Ins permission.
Option 2: Download the add-in CEX file
After your order is complete, download the PDMShell add-in from your Blue Byte Systems Inc account page, from the order confirmation email, or from the PDMShell Download Center.
If you cannot find the add-in installer after ordering, contact Blue Byte Systems technical support.
For standard connected systems, use regular online activation from Manage PDMShell add-in licenses.
Restricted or air-gapped systems
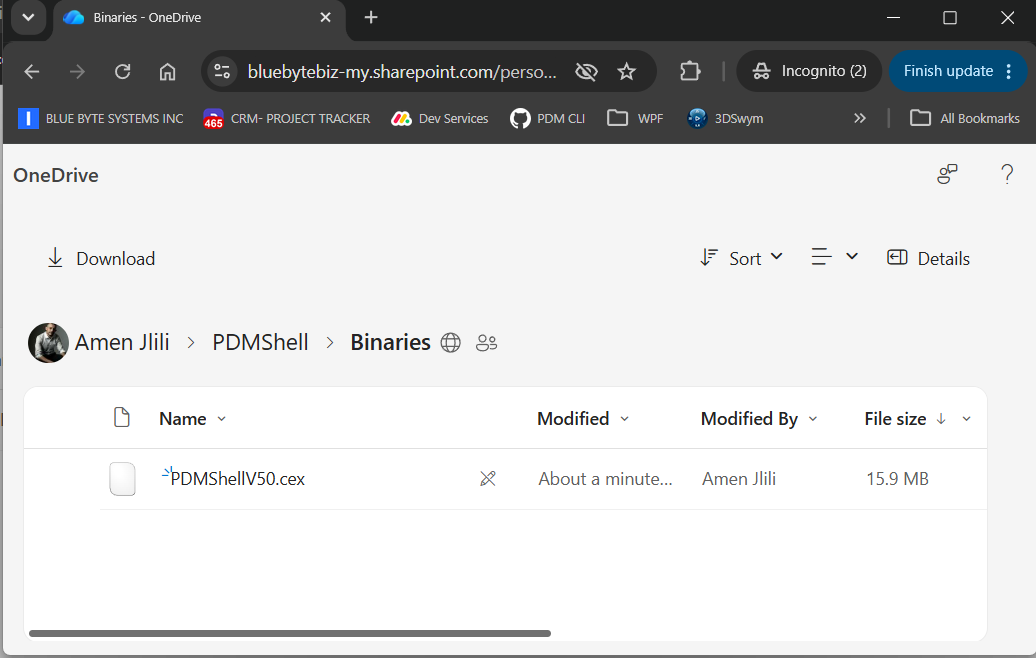
Some vault environments cannot reach Blue Byte Systems servers directly, or only allow Microsoft-hosted locations such as SharePoint and OneDrive. For these systems, use the PDMShell Download Center folder to download the PDMShell .cex file:
The folder contains PDMShell .cex files that can be downloaded through Microsoft-hosted infrastructure and installed manually in the SOLIDWORKS PDM Administration tool.
After PDMShell TaskScript is installed, administrators can open the same folder from the PDM add-in menu:
- Open the SOLIDWORKS PDM Administration tool.
- Log in to the vault.
- Expand
Add-ins. - Right-click
PDMShell. - Select
Download Center....
Manual CEX installation
To install a downloaded .cex file, open it with File > Open... in the Administration tool, then drag the add-in from the CEX window onto the vault's Add-ins node.
Use the SharePoint Download Center for installer files. Use Offline Activation or Manage PDMShell add-in licenses for license activation in restricted environments.
Administrator access
Only administrators should configure add-in scripts. A script can run PDMShell commands against vault files and folders, so test every script before making it available to general users.
License management
Use standalone Settings > Vault add-in > Vault add-in licenses. Select the vault and choose Manage licenses. This requires Edit add-ins permission and is separate from installation. See Manage vault add-in licenses.
Updating scripts
The add-in reads script configuration from its settings when it initializes. If you change command menu items or event trigger points, reload the add-in in PDM so the command list and event hooks are registered again.